Introduction
- So far you have been working with the Furhat directly, now it is time to show you how to develop locally enabling a more powerful developer environment in Eclipse.
- You will be using the Furhat SDK (a beta version) that is in active development. Hence, expect to see updates coming and please do give us feedback!
Requirements
In order to use FurhatSDK you will need to fulfill these requirements:
- Windows 7, 8, or 10 (64-bit)
- Java JDK 1.8
- Microsoft Visual C++ 2010 Redistributable Package
- Eclipse 4.4 (Luna) or newer
This tutorial also assumes that you have completed previous tutorials and has some experience in using windows command line or powershell terminal.
Installing FurhatSDK
- Ensure all requirements above are met.
- Clone or download the FurhatSDK repository to your local machine.
- Please contact FurhatRobotics if you are having issues accessing this repository.
- Use a terminal to install FurhatSDK
- Go into the Furhat SDK folder
- Run
furhat install> Note: this command sets up furhat as a global path variable on your computer, allowing you to run furhat commands globally. - Run
furhat dev-serverto launchFurhaton your local machine.
Running Furhat development server
To run FurhatOS on your local machine, use the command furhat dev-server. This will open a terminal window like shown below along with a face-window.
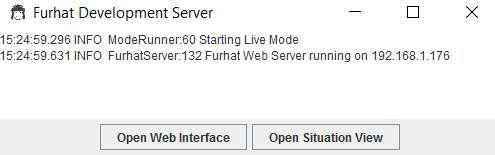
You can access the developmental server web interface either via the "Open Web Interface" button in the terminal windows or by going to http://127.0.0.1 on your browser.
Note: Similar to how you can access your Furhat, your dev-server is accessible to any machine on the same network as the local machine via this IP address printed in the terminal window.
Creating a new skill
There are two ways to create a skill on your local machine. The first is to create the skill through the dev-server's web interface, similar to how you created the skill in the first tutorial. The other way of creating a skill is to use command line, see below.
Recommendation: In order to keep your own repository of skills, it is recommended to place your Furhat skills outside of the repository folder. For instructions of how to do this, see below.
Creating a skill through the web interface
- Click on
Create New Skillbelow the skills in theSkillsmenu. The page below will appear:

The options here are: * Name of Package: Any name that conforms to Java naming standards. This will be the visible name of the skill. * Directory for Skill: Path for where the new Skill and its folder will be created.
Note: this option is not available when creating skills on your Furhat robot. * Template: The Skill template to generate the new Skill from. 2. For the purpose of this demo, name your new skill Hello and select the speech interaction template. 3. Choose any directory on your machine to save your skill. 4. Pick the
Speech Interactiontemplate. 5. ClickCreate.
A new Skill folder will be created in the directory you specified and can be imported into Eclipse as described in the next section.
Creating a skill through command line
You can also create a skill through command line:
- Start by writing
furhat createyou will see the available template options. For this tutorial, create a new skill with the speech interaction template called Hello. - Create the skill by using
furhat create <template_name> <skill_name> <location>. In this case, we want to runfurhat create speech_interaction Hello ..
The location variable is optional with the default location being the
/appfolder of the repository. You are recommended to specify a location outside of the FurhatSDK folder so that you can use your own version handling system for it. You can specify a location relative to your current location. I.e if you are inc:/Users/<UserName>/dev/furhat/skillsand run the create command above the skill will be generated inc:/Users/<UserName>/dev/furhat/skills/hello
- To prepare the skill to be imported in eclipse (behind the scenes creating the necessary Eclipse project files), go to the skill directory as described above and run the command
furhat eclipse.
Importing into Eclipse
The Skill you just made can easily be imported into Eclipse, it is made with the relevant Eclipse project property files.
To import a skill in Eclipse: * File > Import > General > Existing Project > Select the folder you created -> Done
This will import the project folder of the Skill, which contains the skill package, its source folder, the output folder for .class files, and several xml files. If you have ever looked inside a skill package folder, you will see that except for the .classpath and .project files, this folder contains identical files.
File structure
Our sample project should look like this:

Several files are involved in running a Furhat Skill. Some you will have previous experience with from the web interface, some are new and will be covered in this tutorial, and some are static or reference files that do not need to be changed and will not currently be covered.
Before you will have seen the HelloGrammar.xml file as the Grammar view of a Skill in the web interface, HelloFlow.xml as the Flow view, and skill.properties as the Properties view.
HelloFlow.java you will not have seen before. It is the Java file generated by compiling the HelloFlow.xml. In Eclipse you may find it easier to understand Java based errors originating from your flow by inspecting this file.
Please do not edit the
HelloFlow.javafile, as any changes will be lost upon compilation of the xml flow. If you need to add more Java code to your flow, we advise you use the<exec>tag. Anything written inside an<exec>block in the Flow will be directly compiled into theHelloFlow.javafile. For example, in this way it is possible to write a local class into a flow state.
package.xml provides some definitions needed by the Furhat server. The auto-generated file should not need any changes, however if you want to update the version number of a Skill update the version variable in this file. If you would be using external libraries or JARs, this is where you would define them.
HelloSkill.java this is the Skill object that is run by the Furhat server. Described below:
Walkthrough of the Skill file (HelloSkill.java)
The skill file is an important file that you have not seen on the Furhat web interface. It is the entrypoint of a skill that decides what resources the skill should set up, what grammars it should use, what flow to use etc. It is also a good place to define custom Java objects that you want to pass on to your flow.
The two main methods are the Skill constructor and init. The Skill constructor is used when Furhat starts up or reloads the mode. The init method is called when the Skill is run (when selecting the skill in the web view).
Skill Constructor
The Skill constructor starts by getting the skill.properties file, which is used by the Skill to define certain variables:
public HelloSkill() {
        this.propertiesFile = getPackageFile("skill.properties");
The following block adds files as editable resources in the Furhat web interface. If you wish to see other files in the web GUI, this is where you would add them. Notice that different resource types are used:
        addResource(new FlowResource(this, "Flow", getSrcFile("HelloFlow.xml")));
        addResource(new XmlResource(this, "Grammar", getPackageFile("HelloGrammar.xml")));
        addResource(new XmlResource(this, "Entrygrammar", getPackageFile("EntryGrammar.xml")));
        addResource(new TextFileResource(this, "Properties", propertiesFile));
This block uses the skill.properties file set up the name, language, and recognizer of the Skill. You could add more fields to the skill.properties file and access them in this block.
        try {
            Record config = Record.fromProperties(propertiesFile);
            name = config.getString("name", name);
            language = new Language(config.getString("language", language.getCode()));
            recognizer = config.getString("recognizer", recognizer);
        } catch (Exception e) {
            logger.error(e.getMessage());
        }
This block sets up the requirements for this class, what language Furhat has to speak to use this Skill and what kind of grammars are needed. If these requirements are not met - for example if no open recognizer is set up, the skill will not be able to start.
    SkillRequirements requirements = getRequirements();
        requirements.setLanguage(language);
        requirements.setSpeechGrammar(recognizer.equals(RECOGNIZER_GRAMMAR));
        requirements.setOpenVocabulary(recognizer.equals(RECOGNIZER_OPEN));
The final block adds initial and public states from the Flow as entries to the skill. This means that buttons will be created in the Web interface for the skill.
In this skill example, only the initial state will be added as an entry, hence only one button will be shown. In more advanced skills you might want to add several entries, which then will be done by adding more public states in the Flow.
        addEntriesFromFlow(HelloFlow.class, () -> flow);
    }
Skill initalizer
The init() method is run when a skill is started. First we need to set up all the requirements for the skill.
public void init() throws Exception {
  SkillHandler handler = getSkillHandler();

  if (recognizer.equals(RECOGNIZER_GRAMMAR))  {
    handler.loadContext("default", new SpeechGrammarContext(new SRGSGrammar(getPackageFile("HelloGrammar.xml"))));
    handler.setDefaultContext("default");
  } else if (recognizer.equals(RECOGNIZER_OPEN)) {
    handler.loadContext("default", new OpenVocabularyContext(language));
    handler.loadContext("default", new SemanticGrammarContext(new SRGSGrammar(getPackageFile("HelloGrammar.xml"))));
    handler.setDefaultContext("default");
  }
Here, we use the SkillHandler, containing data related to the Mode Furhat is in - usually this will be LiveMode, is fetched and used to load the contexts of this Skill (this is explained here, but think of contexts as the words and phrases that the skill understands for now).
  flow = new HelloFlow(handler.getSystemAgentFlow());
}
Finally, a new HelloFlow is created and passed the SystemAgentFlow - in short a dedicated flow for all Furhat's actions. It is possible to pass on other Java objects to the flow. To be able to receive these objects you will have to create <param> blocks in the beginning of the Flow file. These <param> blocks set up the parameters of the Skill constructor to receive your additional objects passed on.
Skill Folder Structure
The Skill folder has a simple structure. Every skill is a package of it's own and in the package root you will see:
The src folder contains .java files of the Skill, the HelloFlow.xml, and .xsd files that the HelloFlow.xml references. The src folder is inside the package folder.
Other files that will not be compiled but that are used by the Skill:
* The properties files used by the Skill to set variables dynamically through the web interface
* Grammar.xml files, the package xml defining the name, version and additional libraries the skill uses
* The xsd files used to define the structure of XML files (not covered in this tutorial)
* The build.xml that is run by the Eclipse plugin when compiling the flow.
The dependencies of the Skill (the FurhatSDK) are automatically referenced when the Skill is created.
Compiling the XML flow to java
There are three ways to compile a xml flow to java (necessary for the skill to run the flow):
1. Using web interface
Similar to how you did in tutorial 1, you can compile the flow in the web interface. This is the recommended way of compiling while doing changes through web interface. 1. Go to the Flow resource file in the skill list of the web interface 2. Press compile. You will get a status message indicating if it managed to compile successfully.
2. Using Eclipse plugin
We can compile a flow in Eclipse by installing a small plugin. To install this plugin in Eclipse. This is the recommended way to compiling while doing changes to the flow in Eclipse. 1. Choose "Help > Install New Software..." 2. In "Work with", type "https://myfurhat.com/plugins/eclipse" and hit return. 3. Expand the group that comes up in the list and select "IrisTK Eclipse Plug-in". You may have to uncheck the "Group items by category" checkbox in order to see it. We also advise you to uncheck "Contact all update sites...", to speed up the installation. 4. Choose "Next" and follow Eclipse's instructions.
With an installed Eclipse plugin, you only have to: 1. Right click on the xml flow file or anywhere in the flow file in Eclipse.

- Select
Compile flow. You will get output in the console window in Eclipse.
3. Using command line
The third option is to compile using command line. This is recommended if you want to do a batch script or other automations.
1. Write furhat cflow -b <path_to_flow> where the -b tag indicates that you also want to compile the outputted java flow to binary class files (needed if you want to package the skill to a Furhat)
Packaging and Uploading a Skill.
Now that you've been developing a Skill in Eclipse, you will eventually want to upload it to a Furhat. To do this, we will use the terminal to create a zip folder that then can be uploaded to any Furhat server.
Packaging
You can package your skill either by zipping all files in the skill folder OR by using the following furhat commands on commandline:
1. First use the command furhat packages to list all packages.
2. Make sure your skill is listed (if not run furhat eclipse from the skill folder)
3. Run furhat zip <skill> where
Uploading
Uploading a Skill to a Furhat server is a simple process. On the Furhat web interface, go to menu: Server > Packages. You will see this page:
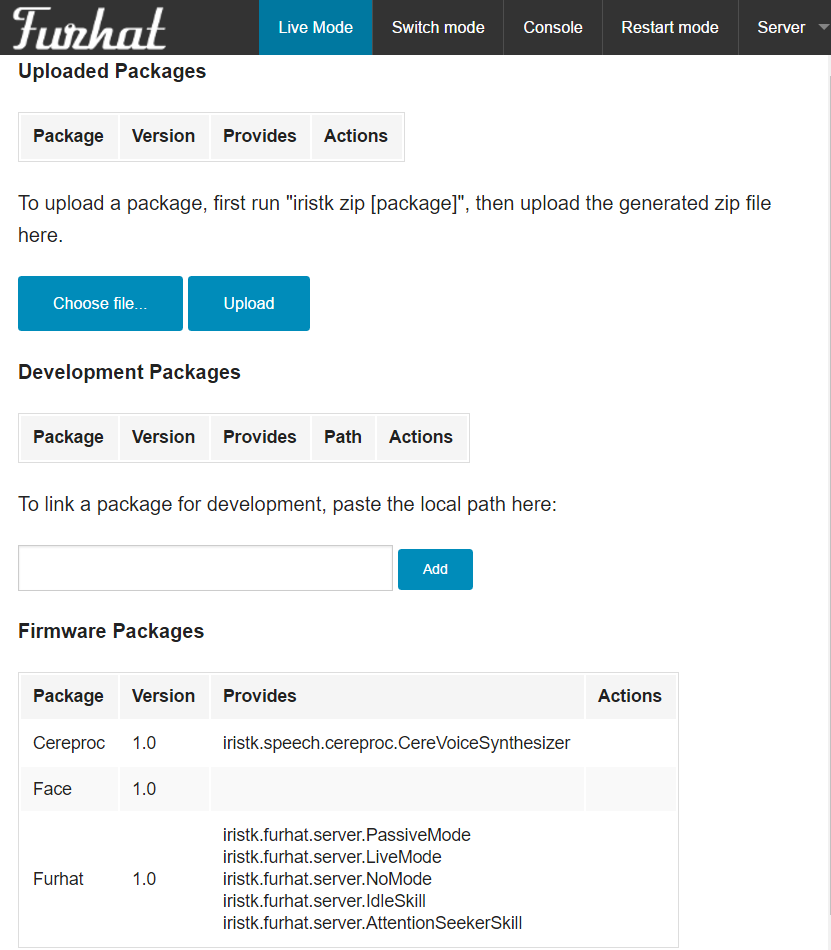
Use Choose file... to select the zip folder created in the previous section, then Upload . If your Skill does not appear immediately when you switch to the Skills menu, click Restart Mode and it will show up once the Mode restarts.
Note that when uploading a newer version of a Skill that is already on the server, you will need to first delete the old Skill before uploading the newer version. This will be fixed in an upcoming release.